

Supports & Braces Buying Guide
A buyer guide to measuring, sizing and fitting supports and braces, for clinics, facilities and patients ordering for home recovery.
Home › Buyer Guides › Supports & Braces Buying Guide
Take This Guide With You
The full Supports & Braces buying guide as a printable PDF, with the comparison points and the pre-order checklist. Share it with facilities, purchasing or whoever signs off.
Supports & Braces in Stock Now
A live view of what is available in Supports & Braces right now. Prices and availability come straight from the catalog.
-
 Quick ViewSelect options
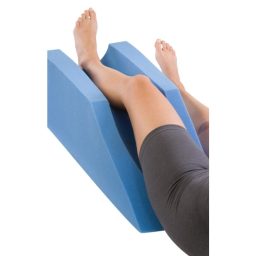
Leg Elevator Full Foam 45° Angle
Item# 19109-97DJO$217.10Original price was: $217.10.$117.10Current price is: $117.10. -
 Quick ViewSelect options

How to Measure and Fit a Support or Brace
Choosing a support or brace comes down to one number taken correctly. A brace is sized to the limb it is applied to, using the measurement the manufacturer’s chart names for that model, and almost every fitting problem traces back to a measurement that was taken the wrong way, on the wrong limb, or read against the wrong chart. This guide walks through how to take that measurement, what to do when it lands between two sizes, why a poor fit ends with the device in a drawer, and how a facility keeps sizes on the shelf without carrying every size of everything. For what the line holds by body region, see the supports and braces category page.

Who Is Buying a Support or Brace, and What Changes With Each Buyer?
The measurement problem is the same for every buyer, but the workflow around it is not, and that is what changes how you order. Identify which of these you are before you start, because it decides whether you are sizing one patient or building a size policy.
- A patient or caregiver ordering for home recovery. Usually one item, often measured at home without a clinician present, and a wrong size means a return and lost days. Take the measurement before ordering, not after the package arrives.
- An outpatient clinic that fits on site. The measurement and the fitting happen in the same visit, so the question is whether the size is on the shelf that afternoon or the patient comes back.
- A hospital rehabilitation department or skilled nursing facility. Many patients, rotating staff, and a stock room. Here the risk is that three people measure three different ways, so the technique has to be written down, not assumed.
- An athletic training room or EMS service. Grab and go kit items sized to the kit rather than to a named patient, so the buying question is coverage and readiness rather than individual fit.
All four sit under MSEC’s wider rehabilitation equipment and products range, and all four are served by the same rule: order from a measured number and a current manufacturer chart.
Which Measurement Does the Sizing Chart Actually Ask For?
Read the chart before you pick up the tape, because different models ask for different quantities and they are not interchangeable. Sizing is not a single measurement that works everywhere.
- A circumference at a named landmark. The most common ask. The chart names the point on the limb, and the same limb gives a different number an inch higher or lower.
- A length between two landmarks. Longer braces that span a joint often size on length as well as girth, and a limb that fits the girth range can still be outside the length range.
- Shoe size. Some foot and ankle products size to footwear. That is only correct when the chart says so, and it is never a stand in for a circumference.
- Waist or hip measurement. Used on back and abdominal supports, and often taken at a point the chart specifies rather than where a belt normally sits.
- A stated joint position. Some charts require the measurement with the joint at a described position, because the soft tissue moves with it.
Write down which quantity you took, the units, the limb and the model it was taken for. A number with no label is a number you will have to take again. Never convert one quantity into another, and never read a measurement against a chart from a different model or a different manufacturer.
How Do You Take That Measurement So It Holds Up?
Take it on the limb that will be braced, against the skin, at the landmark the chart names, with a flexible tape kept level and snug, and record the number rather than only the size it produced. Everything below is a way of protecting that number from drifting.
- Measure against the skin unless the chart says otherwise. A measurement taken over clothing, a dressing or a bandage describes the dressing, not the limb. If the device will be worn over a dressing, that is a question for the clinician and for us before ordering, not something to add on by guesswork.
- Keep the tape level around the limb. A tape that angles rather than sitting perpendicular reads long, and on a tapered limb it reads long enough to cross a size boundary.
- Use the position the chart describes. Seated, standing and weight bearing produce different calf and thigh numbers on the same person.
- Date the measurement. A limb changes through recovery, so a number taken weeks before a fitting may no longer describe the limb. When to re measure is the treating clinician’s call.
- Document the method once, for everyone. In a facility, one written procedure with the landmark, the tape type and the position removes most of the variation between staff.
Do not substitute clothing size, body weight or the opposite limb. Injury, surgery and limb dominance all mean the two sides frequently do not match.
What Do You Do When the Number Falls Between Two Sizes?
Stop and look at how the chart is built rather than rounding by instinct, because the right answer depends on the model, not on a general rule. Boundary cases are where most avoidable returns are created.
- Check whether the ranges overlap or abut. Some charts overlap at the edges, which means either size is valid and other factors decide. Some stop and start at the same number, which means the boundary is real.
- Look at how much adjustment the design carries. A wraparound with straps absorbs a boundary measurement far better than a pull on elastic sleeve, which has very little tolerance in either direction.
- Ask what the device is worn over and under. A brace worn under clothing or inside a shoe has less room than the same brace worn over a trouser leg.
- Prefer the model that puts your number mid range. When two comparable models split the boundary differently, the one whose band centers on your measurement is the safer order.
Call MSEC toll free at 877-706-4480 or local at 713-706-4480 with the number, the landmark and the model in front of you, and we will read it against the current manufacturer specification rather than guessing from a size label.
Why Does a Brace That Does Not Fit Stop Being Worn?
Because wearing it is a decision the patient makes many times a day, and a device that slides, pinches or cannot be put on without help loses that decision. A brace sitting in a drawer is not a clinical question, it is a fit and practicality question, and it is worth understanding before you blame the product.
- Migration. A brace that is too large travels down the limb and has to be pulled back into position constantly. Few people keep doing that.
- Pressure points. Edges, seams, hinges and buckles sitting in the wrong place become the reason the device comes off after an hour.
- Closures set too tight. A patient who finds a device uncomfortable will loosen it until it is comfortable, at which point it is no longer doing what it was fitted to do.
- Donning difficulty. A patient bracing a dominant wrist or elbow is fastening straps one handed. If the closure needs two hands and a caregiver is not always there, the device gets skipped.
- Bulk and heat. An ankle brace that will not fit inside the patient’s own shoe, or a support that will not sit under work clothing, competes with daily life and usually loses.
When a facility hears that a brace was not used, the first thing to check is the fitting record and the measurement. Whether the device type remains appropriate is the treating clinician’s decision.
How Do You Compare Two Braces That Look the Same on Paper?
Put the two sizing charts side by side first, then compare adjustment range and parts. Two products described in the same words can behave completely differently once you see how their sizes are cut.
- Range coverage against your population. If one chart stops short of the measurements you actually record, a share of your patients will never fit it, whatever the unit price says.
- Size increments. Four sizes across a span fit more people more closely than two, at the cost of more stock lines to hold. That trade is a stocking decision, not a quality judgment.
- How much the design adjusts. Straps, pull tabs and open panels widen the usable band of each size. A fixed sleeve does not.
- Universal against side specific. A universal item halves the number of lines you carry. A side specific item has to be ordered correctly every time.
- Stated cleaning method. Compare each manufacturer’s instructions against your protocol before you standardize, because that answer can disqualify a product you otherwise prefer.
The single most useful request you can make of any supplier is the current manufacturer sizing chart for both models. Ask for it before you compare anything else.
How Does a Facility Stock Sizes Without Carrying Every Size of Everything?
Split the line into what you fit from the shelf and what you order against a measurement, then hold depth only where your own fitting history justifies it. No facility can stock a full size run of every model, and none needs to.
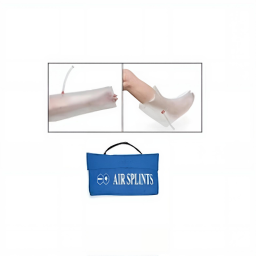
- Stock what is not patient sized. Kit and positioning items such as the Inflatable Air Splints Kit for a response bag, or the Leg Elevator Full Foam 45° Angle, are held for readiness rather than fitted to a chart.
- Order sized items against the measurement where the lead time fits inside the plan of care. Stock only the sizes you fit often enough to justify the shelf space.
- Log every fitting for a quarter. Model, size, date, limb. That log is your size curve, and it will not be an even spread.
- Carry the middle deep and the ends thin. Then set the reorder point at lead time plus a buffer, so you order before the last unit of your most used size leaves.
- Limit the number of models. Every additional model multiplies by its own size run, so two models well stocked beat five models half stocked.
To price a size curve or set up a facility reorder against your own fitting log, email inquiry@msecompany.net or call 877-706-4480.
Which Fitting Mistakes Produce Returns, and How Do You Avoid Each One?
Most returns in this line come from six mistakes, and each has a one line fix. Work through them before the purchase order goes out rather than after the package is opened.
- Ordering from clothing or shoe size. Fix: take the measurement the chart names, unless that chart specifically sizes to footwear.
- Measuring the uninjured limb. Fix: measure the limb being braced, every time, and note which side it was.
- Measuring over a dressing or clothing. Fix: measure against the skin, and raise the dressing question separately before ordering.
- Pulling the tape tight. Fix: snug, not compressing. A tight tape produces a smaller number and a device that will not close.
- Using an old or borrowed chart. Fix: confirm the chart belongs to that model and is current, because charts are revised and they are not shared between brands.
- Ordering the wrong side, or assuming universal. Fix: check side specificity on the specification before ordering, and confirm that a universal item’s stated limits actually cover your measurement.
One more worth naming: opening several units to try them on. Ask us about return terms for soft goods before you open more than one, since items worn against skin are handled differently from boxed equipment.
What Should You Have Ready Before You Order or Call?
Have the measurement, the model and the use in front of you, and the order takes one call instead of three. This is the short pre order checklist we work from at MSEC.
- The measurement, its landmark and its units, plus which limb it was taken on and the date it was taken.
- The model or product name you are sizing, or a description of the application if the device type is already decided by the clinician.
- Whether it is worn over a dressing, under clothing or inside a shoe.
- Single patient or reissued, since that changes what makes sense to order.
- Your facility’s cleaning protocol, naming the agent and method, so we can check it against what the manufacturer states.
- Quantity and delivery details, including whether a facility restock needs dock access and who signs for it.
Browse the full range of supports and braces stocked by MSEC, then call 877-706-4480 toll free, 713-706-4480 locally, or email inquiry@msecompany.net with your measurement in hand and we will read it against the manufacturer specification for the model you want.
Frequently Asked Questions
What do I measure if the sizing chart does not name a landmark?
Do not guess one. Send us the model name or product link and we will check what the current manufacturer specification calls for before you measure. Charts that appear to omit a landmark have usually been superseded, or the item sizes on something else entirely, such as shoe size or a length rather than a circumference. Measuring at the wrong point is the most common cause of a size that has to be exchanged.
Should the measurement be taken over a dressing or against bare skin?
Against bare skin unless the manufacturer chart states otherwise, because a measurement taken over a dressing describes the dressing rather than the limb. If the device is intended to be worn over a dressing or a liner, treat that as a separate question and confirm it with the treating clinician and with us before ordering, rather than adding an allowance to the number yourself.
My measurement is right on the line between two sizes. Which one do I order?
It depends on the model rather than on a general rule. Check whether the chart’s ranges overlap, and how much adjustment the design carries, since a strapped wraparound tolerates a boundary measurement far better than a pull on sleeve. Call 877-706-4480 with the number, the landmark and the model, and we will read it against the current manufacturer specification rather than rounding it for you.
How many sizes should a clinic actually keep on the shelf?
Fewer than most clinics expect, and weighted to the middle of the curve. Log every fitting for a quarter, then stock depth in the sizes you fit repeatedly and order the outliers against a measurement. Holding two models well is better than holding five models thinly, because every extra model multiplies by its own size run and ties up shelf space that your usage history does not support.
Can we send our measurements over and have them checked before we place the order?
Yes. Email inquiry@msecompany.net or call 877-706-4480 with the measurement, the landmark it was taken at, the limb and the model you are considering. We will check it against the current manufacturer sizing chart for that specific model and tell you plainly which size it corresponds to, or tell you that the chart asks for a different measurement than the one you took.
A patient stopped wearing a brace we fitted. What should we check first?
Start with the fitting record and re take the measurement, since migration, pressure at an edge or a closure the patient cannot manage one handed are practical fit problems rather than product faults. Check what the device is being worn over or inside as well. Whether the device type remains appropriate, and what is fitted instead, is the treating clinician’s decision.
Ready to Shop Supports & Braces?
Browse the Supports & Braces line, or go up to all rehabilitation equipment. Toll free 877-706-4480 | Local 713-706-4480 | inquiry@msecompany.net
Take This Guide With You
The full Supports & Braces buying guide as a printable PDF, with the comparison points and the pre-order checklist. Share it with facilities, purchasing or whoever signs off.